

The three checks, in screenshots
Here’s what to look for in Brave’s Network panel. These are fresh browser captures from our October 3 test on introtrace.net, with analytics consent accepted in every run. The filter shown is /gtag|collect|relay/, which keeps the Google tag, collection requests, and relay requests in view. Identifier values are hidden in these captures. The full instructions follow below.
1. Shields off, recovery off: find a working baseline
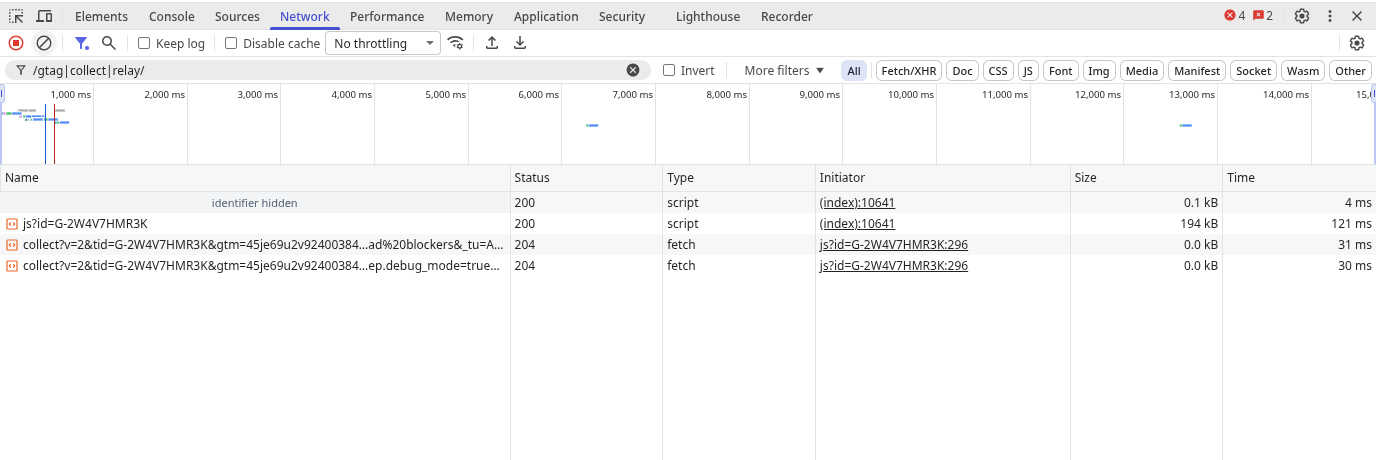
Open developer tools, select Network, then reload your test page and trigger one event. Find the GA4 collect request and check its status. Our test request received 204. Next, confirm the event in GA4 DebugView.
2. Shields on, recovery off: check what changes
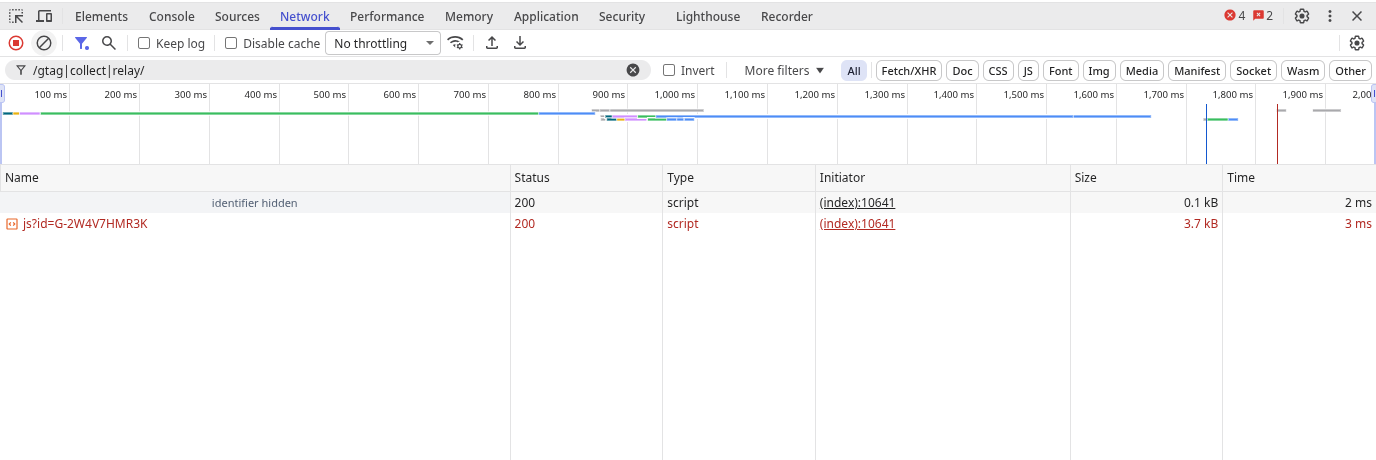
Turn Shields on for the same site, leave recovery off, and repeat. In this run, the Google tag did not initialise and no GA4 collection request appeared. The red script row still shows 200, so its status alone would have been misleading. A missing collect request needs context: we already had a working baseline, used the same event, and kept consent accepted.
3. Shields on, recovery on: follow the relay
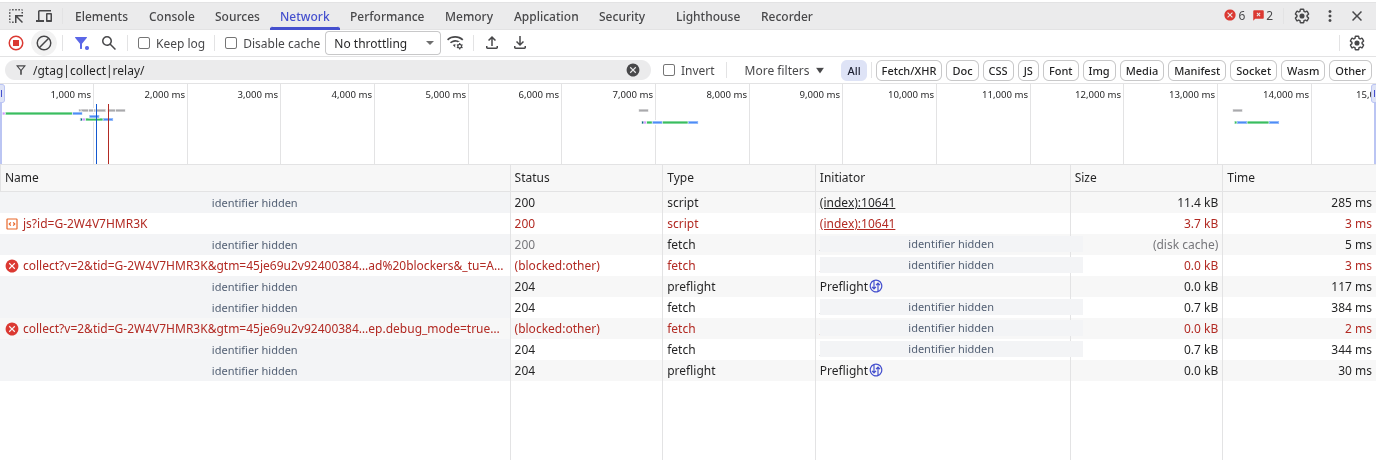
Keep Shields on, enable recovery, and repeat once more. Our direct collect requests were blocked; the subsequent requests through Introtrace’s relay received 204. The relay rows use long request names, so open a row and check its hostname if you’re unsure which request you’re looking at.
Finish in GA4 DebugView
Select the device used for your test, then open the matching event and check its parameters. If a manual debug event appears but your test event doesn’t, check the device selector first. We had several devices listed during testing, and selecting the right one resolved that confusion.
The earlier GA4 verification below includes a screenshot of both control events with no blocked-test event in the summary. It belongs to the earlier test, not these fresh browser captures.
For this walkthrough, we sent introtrace_walkthrough_test with a different test_run value for each run. Recovery was disabled only in our test browsers by replacing the loader response with empty JavaScript; the public site stayed unchanged. On your own test page, use your installation’s normal on/off control.
Read the fresh browser observations (JSON). These captures verify browser behavior; they do not add a new GA4 receipt check or a WooCommerce purchase test.
Download the screenshot walkthrough (Markdown).
Ready to try it? Get the Introtrace script, then use the three runs below to check your setup.
What you'll need
Use a test page where you can turn recovery on and off without changing the rest of your analytics setup. A staging site connected to a test GA4 property is a good choice, provided it uses the same relevant analytics and consent configuration as your live site.
You'll also need access to that property's DebugView and a desktop copy of Brave. We recommend Brave for this walkthrough because its tracking protection is built in. You don't need to install an extra browser extension.
Choose an action you already track: opening a page, submitting a test form, or completing a test purchase. Write down the event you expect. For a first check, a single page_view is usually easiest to follow.
Record the page URL, GA4 measurement ID, Brave version, test date, and Shields settings. Keep those settings the same during the two blocked tests.
Set up your view of the event
Open Brave's developer tools and select Network before loading the test page. Enable Preserve log if your action navigates to another page, and Disable cache while developer tools are open. Clear the log before each run.
You'll be looking for two things: the analytics script loading and the event request leaving the browser. They're separate steps. A script can load successfully while its event requests are blocked.
For a direct GA4 setup, Google's troubleshooting guide points to requests such as google-analytics.com/g/collect and analytics.google.com/g/collect. With recovery enabled, the request may use a different hostname or path. Search for collect first, then inspect the requests used by your recovery setup rather than filtering only for Google's domains. Google's setup troubleshooting guide
In GA4, open Admin → Data display → DebugView. Enable debug mode for your test device using Google's web-based Tag Assistant or GTM Preview; no debugger extension is required. Confirm the baseline event appears before relying on this view for the blocked tests. Google's DebugView guide
If blocking prevents the preview connection from working, record that too. On a controlled test page, you can instead configure debug_mode: true for the test events, following Google's guide. Keep that configuration consistent across all three runs and remove it when you're done.
Test 1: confirm analytics works without blocking
Turn recovery off on your test page. Click Brave's lion icon in the address bar and turn Shields off for this site, then reload. Brave lets you change protection for an individual site through this panel. Brave's Shields settings guide
Accept analytics consent through your site's normal banner. Perform your chosen action once.
Check the Network panel for the script and event request. Then check DebugView for the expected event, choosing your test device if several are listed. Open the event and inspect its parameters.
For a page view, does the page location match? For a form submission, is it the event your setup is meant to send?
If the event is missing here, resolve that first. Check the measurement ID, event trigger, consent state, and any browser errors. You need a working baseline before you can tell whether recovery changes anything.
Test 2: see what Brave blocks
Keep recovery off. Turn Shields back on for the site and note the selected tracking-protection level. Reload, check that analytics consent is still accepted, and repeat the same action once.
Compare this run with the baseline. Does an analytics script fail to load? Is the event request marked as blocked or failed? Does the event disappear from DebugView?
Save the relevant request details and the time of the action. Brave's blocked-item count alone won't tell you whether your particular GA4 event was affected.
You may find the event still arrives. That's useful information: this configuration hasn't reproduced a loss for the event you're testing. Don't count the next run as proof of recovery unless you've first observed something that needs recovering.
Test 3: enable recovery and repeat
Leave Shields on with the same settings. Enable recovery on the test page, reload, confirm the same consent choice, and perform the action again.
Follow the script and event requests in Network. A recovery setup may serve the script through a proxy, forward the event through another endpoint, or do both. Look at the actual request path used by your installation.
Then check GA4 for the event and its parameters. If you're using Introtrace, the GA4 ad blocker recovery guide explains how blocked scripts and event requests are handled.
What a successful recovery test looks like
The useful result is a clear comparison: the event arrived in the baseline, was missing when blocking was enabled, and arrived again with recovery enabled. A successful response from a recovery endpoint is only part of that check; verify the corresponding event in GA4 as well.
Keep a small record as you go:
| Run | Shields | Recovery | Request observation | GA4 observation |
|---|---|---|---|---|
| Baseline | Off | Off | Record what happened | Record what happened |
| Blocking | On | Off | Record what happened | Record what happened |
| Recovery | On | On | Record what happened | Record what happened |
These are fields for your own results, not expected outcomes for every site.
Our Brave test on Introtrace
We ran this comparison on introtrace.net on October 3, 2026, using desktop Brave 1.94.117 (Chromium 152.0.7977.64). Each run used a separate temporary profile, accepted analytics consent, and the same test event: introtrace_recovery_test.
For the two recovery-off runs, we replaced the recovery loader with empty JavaScript in the test browser. The public site stayed unchanged. Blocking came from Brave’s built-in Shields, with its filter components loaded; we added no blocking extension or custom rules.
| Run | What we observed in the browser | GA4 DebugView result |
|---|---|---|
| Shields off, recovery off | The Google tag initialised. The test event request to Google’s collection endpoint received HTTP 204. | Baseline parameters received in a repeat test |
| Shields on, recovery off | The Google tag did not initialise. The test event stayed queued, and no GA4 collection request was observed. | Not present in the repeat test’s DebugView summary; both control events received |
| Shields on, recovery on | The Google tag initialised. Direct GA4 requests failed with ERR_BLOCKED_BY_CLIENT; relay requests then received HTTP 204. | Recovery-run parameters received |
We checked both delivery cases in GA4 DebugView. The original recovery entry at 09:18:48 showed test_run set to recovery. A repeat baseline test at 09:49:47 showed test_run set to baseline. Both screenshots showed debug_mode set to 1 and page_location set to https://introtrace.net/. Times are in Berlin local time.
Checking the blocked event with two controls
To check absence, we repeated the blocking test between two control events in the same temporary Brave profile, with recovery off throughout. The first control reached DebugView at 10:01:43. We enabled Shields and triggered introtrace_absence_blocked at 10:05:25. It stayed queued in the browser, with no GA4 collection request observed.
After a five-minute observation window, we disabled Shields and sent the final control at 10:10:49. The DebugView screenshot captured at 10:18:26 lists both controls in its last-30-minute summary, with no blocked-test event. All three reported events are accounted for: one earlier recovery-test event and one of each control.
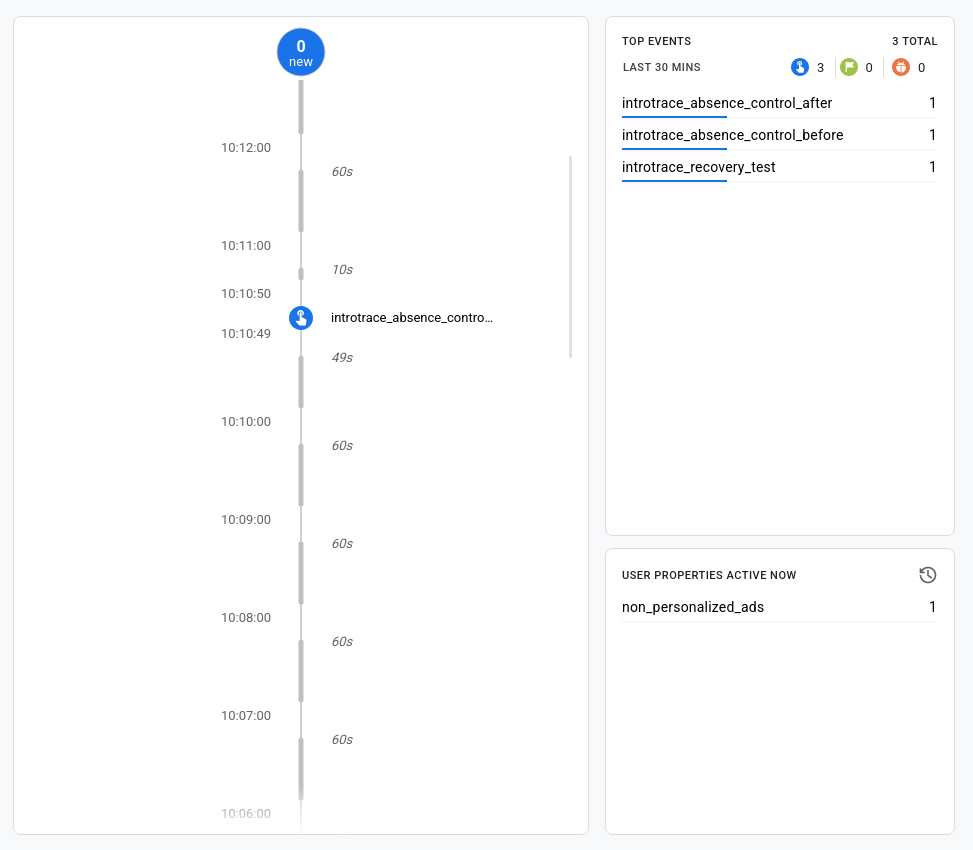
This supports a bounded result: no blocked-test event was recorded during our five-minute test window. It does not prove permanent absence from every report or guarantee recovery across other browsers. Declined consent, attribution, and duplicate handling remain outside this recorded example.
One testing detail mattered: our initial headless runs triggered the site’s bot detection, which disables fetch requests. We excluded those runs and used desktop Brave for the comparison above.
View the recorded test observations (JSON). Request identifiers and visitor data are omitted.
Check that the recovered data is useful
Once the event arrives, check its contents. Recovery isn't much help if a purchase loses its value or a form submission appears twice.
Compare the event name and relevant parameters with your baseline. Perform a single deliberate action and look for unexpected duplicate events. Count events rather than raw requests: one action can involve several requests, including a blocked attempt and a relay.
For ecommerce, check transaction_id, value, currency, and item details. Use a different synthetic order ID for each new test order. Reusing an ID can make a valid test purchase disappear through deduplication. Google documents purchase deduplication for web streams; it isn't a general safeguard for every event. Google's transaction ID guidance
An event in DebugView confirms receipt for this test. It doesn't establish complete attribution or prove that every production event will arrive.
Repeat with consent declined
The first three runs use accepted analytics consent so blocking is easier to isolate. Now repeat them with consent declined. Reset the site's saved consent choice before each run and check the resulting state.
Decide what should happen based on your implementation. In basic Consent Mode, Google tags are held back until consent is granted. In advanced Consent Mode, tags can load and send cookieless measurements while analytics storage is denied. Google's Consent Mode overview
Check that enabling recovery preserves the intended consent behavior. If tags are supposed to stay inactive after rejection, a recovered event would be a reason to investigate.
Don't use an empty DebugView as the sole test here. Google notes that events aren't visible there when Consent Mode is implemented and the user hasn't consented to Analytics cookies. Inspect tag behavior, consent state, requests, and storage too. DebugView's consent limitations
For more context, see Consent Mode v2 vs ad blocker recovery.
If the result isn't clear
| What you see | What to check next |
|---|---|
| No event in the baseline | Measurement ID, consent, event trigger, and browser errors. |
| The event arrives with Shields on and recovery off | Whether this configuration blocks the script or event at all. |
| The script loads, but the event is missing | The event trigger and outgoing request; script loading alone isn't enough. |
| The recovery endpoint responds, but GA4 is empty | Destination property, forwarding errors, debug mode, and report filters. |
| One action produces duplicate events | Multiple tag installations or overlapping event and relay handling. |
| DebugView works, but ordinary reports differ | Report filters and processing time; standard reports aren't an immediate test. |
Google's setup troubleshooting guide covers destination IDs, filters, and reporting delays.
Your testing checklist
Download the checklist (Markdown) to keep a copy of your results.
- Record the test date, page, browser version, Shields settings, and GA4 property.
- Choose one action and write down its expected event.
- Confirm the event arrives with Shields and recovery off.
- Repeat with Shields on and recovery off; record what is actually blocked.
- Repeat with Shields and recovery on; verify receipt in GA4.
- Compare event parameters and check for duplicates.
- Repeat with consent declined and verify the intended behavior.
- Save the observations and remove temporary debug settings.
Keep this record so you can repeat the test after changes to your tags, consent banner, or recovery installation. Passing it gives you evidence for the browser, settings, and events you tested. Broader coverage takes additional tests with other browsers and blockers.
If you're setting up Introtrace, the recovery guide explains installation. Once it's in place, use the comparison above to check what happens on your own site.